- May 3, 2024

-
-
Loading
Loading
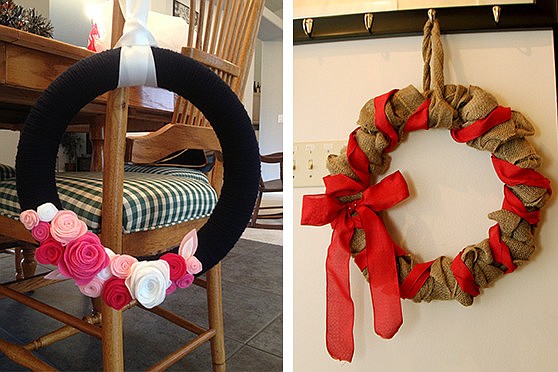
Got an itch to explore new territory with your holiday decorations this Christmas? Try your hand at this do-it-yourself yarn wreath!
Yarn wreath
What you need:
one cylindrical styrofoam wreath
a ball of yarn
scissors
hot glue gun and glue sticks
at least four squares of felt (any colors)
about three feet of ribbon
What to do:
Although they might require a pretty good chunk of time, these DIY wreaths are simple to make and are a cute, homemade addition to any friend or loved-one's home. You will to need to start with one cylindrical styrofoam wreath, which can be found at any local craft store. Any size will do, but I prefer the smaller sizes because they have less ground to cover, ensuring that the wreath fills out nicely.
The first step will be wrapping your wreath, and I like to start with a dab of glue to hold the end of the yarn in place as you begin. Don't worry about making the yarn layer gap-free on the first round, as you will most likely need to wind completely around the wreath in three layers before it's completely covered.
Once you're happy with the yarn coverage, finish it off with a knot and tuck away or cut off the excess.
Now: the fun part! There are a variety of felt flowers to be made, but I just stuck to two styles for this project.
For style one: Begin by cutting out a circle. Then cut the circle into a spiral, starting from the outside edge and slowly working your way to the center, leaving the spiral strip about .5-inch wide. Then, with your hot glue gun ready, begin winding the strip into a coil so that the outer edge (where you began cutting) is in the center, and the middle of the circle ends up sticking out last. I like to use a few dabs of hot glue as I'm coiling the felt, just to keep everything stable and in place. When all you have left is the "center" of your original circle, place a dime-sized dollop of hot glue on the bottom of your flower and seal it down to create the flower's base.
For style two: Follow these same directions but with a wiggley-edged circle (shoot for about 1-inch waves) and a wiggly spiral inward. This will create the more rose-like flowers that you see pictured.
Once you've made your array of differently sized flowers, assemble them any way you like on the wreath and start gluing them down.
The final step is creating a ribbon handle to hang the wreath. With your strand of ribbon, make a loop knot around the top of the wreath and tie the two ends together into a bow.
That's it! If you're feeling creative and have leftovers, you can try making felt leaves to throw in the mix, as well, or add in some festive greens or decorations.
- Submitted by Mallorie Bruce, Palm Coast Observer Design Editor
Burlap wreath
What you need:
1 metal wreath form
1-2 packages of 4-inch burlap
ribbon or other decorations
What to do:
Secure the end of the burlap to the metal wreath form. Weave it in and out. This will secure the burlap.
Continue all the way around the wreath form, pushing the loops close together as you go, this will make it bunch out and be fluffy.
When the wreath is done, cut the end about 4 inches long and weave it through the wreath form to secure.
Once the form is complete with the burlap, it’s time to add embellishments. I used a cloth-like, red ribbon and looped it around the entire wreath form. I finished it off with the large bow made of the same ribbon and pinned it to the burlap with a few sick pins.
I like this wreathe because, once the burlap is on, it can be the canvas for a variety of different seasonal wreathes. All you have to do is change out the embellishments.
- Submitted by Shanna Fortier, Palm Coast Observer Community Editor